The Essential Guide to Maintaining Integrity: A Step-by-Step Procedure to Clean FRP Chemical Storage Tanks
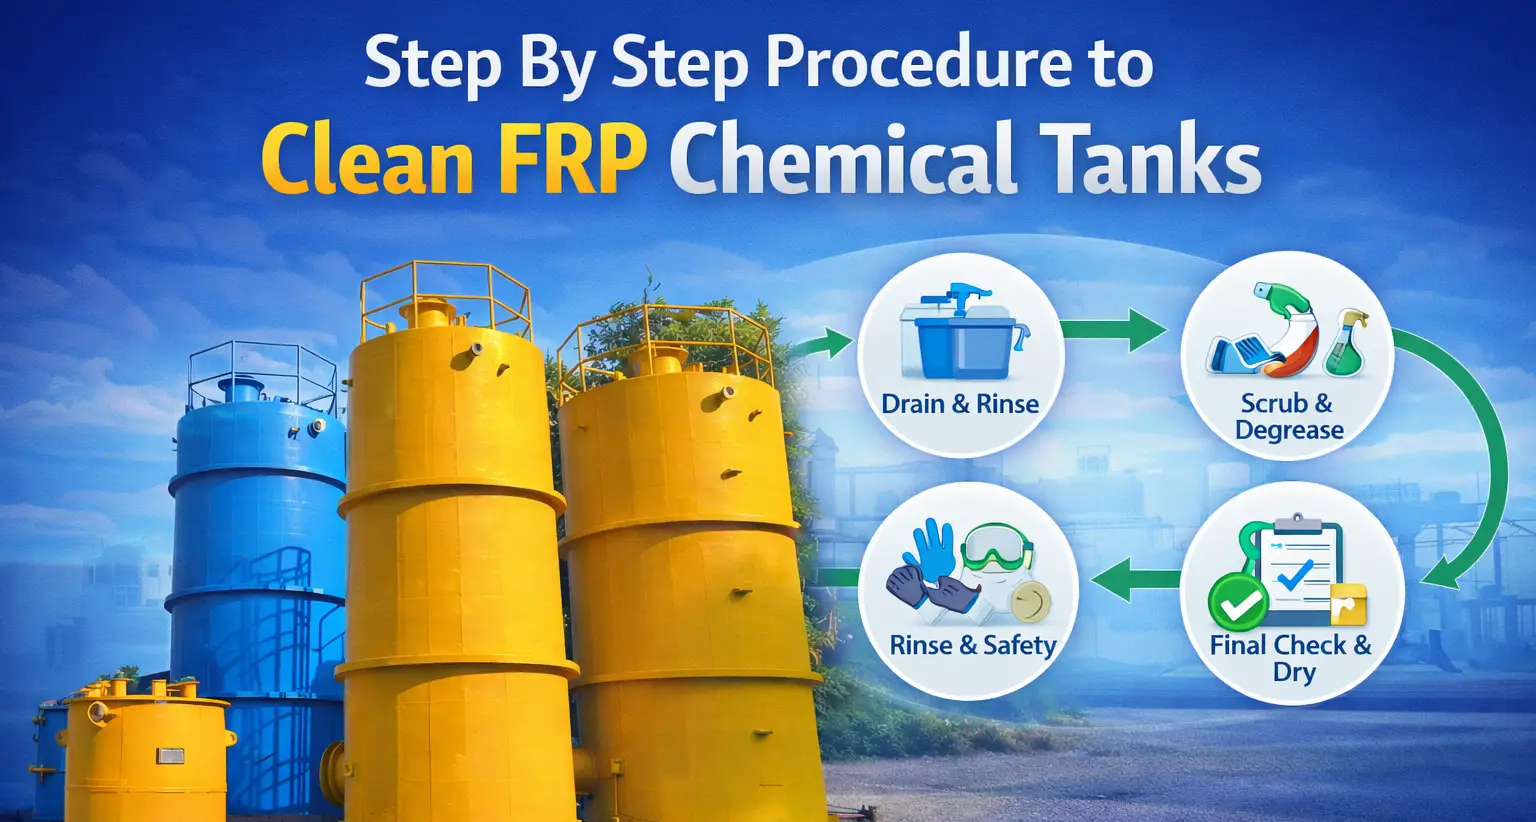
Procedure to Clean FRP Chemical Storage Tanks
FRP Chemical Storage Tanks are renowned for their exceptional corrosion resistance and durability. These robust containers reliably hold aggressive chemicals, acids, and solvents across countless industries. However, their long-term performance and safety depend on a critical practice: proper and regular cleaning. A systematic cleaning procedure prevents product contamination, maintains structural integrity, and ensures a safe working environment. This guide provides a detailed, step-by-step process for effectively cleaning your FRP tanks.
Understanding the Importance of Regular Cleaning
Regular maintenance is non-negotiable for FRP storage Tanks. Residual chemical sludge can degrade the interior surface over time. Furthermore, cross-contamination between different batches can ruin valuable products. Consequently, a rigorous cleaning schedule safeguards your tank investment. It also protects the quality of your stored materials. Ultimately, this practice minimizes downtime and prevents costly repairs or replacements. Leading FRP Chemical Tanks Manufacturers always emphasize this vital aspect of ownership.
Pre-Cleaning Preparation: Safety and Planning
Safety must be your absolute priority before starting any cleaning operation. Proper preparation sets the stage for a smooth and hazard-free process.
Developing a Cleaning Plan and Permit
First, create a detailed cleaning plan for your specific Acid Storage Tanks. Identify the previous contents and their associated hazards. Then, secure all necessary work permits for confined space entry and hazardous work. Always assume the tank contains dangerous vapors. Therefore, you must test the atmosphere before entry.
Gathering Necessary Safety Equipment and Tools
Next, assemble all required personal protective equipment (PPE). This equipment typically includes chemical-resistant suits, gloves, goggles, and full-face respirators. You will also need specialized cleaning tools. These tools often include non-sparking, soft-bristle brushes and plastic scrapers. Additionally, prepare compatible hoses, pumps, and drainage equipment. Finally, ensure you have a reliable communication system and a dedicated safety watch person.
Isolating and Preparing the Tank
The initial physical step involves complete isolation. Lock out and tag all energy sources connected to the tank. This includes pumps, mixers, and heating coils. Then, close all inlet and outlet valves securely. After that, drain the tank completely of all chemical product. Pump the contents into a designated, approved secondary container. Remember, never drain aggressive chemicals directly into standard sewers.
Step-by-Step Cleaning Procedure
Following preparation, you can begin the meticulous cleaning process. Adhere strictly to this sequence for optimal results.
Step 1: Initial Rinsing and Residual Removal
Begin with a thorough cold water rinse. Use low-pressure water to remove loose residues and dilute remnants. For stubborn solids, employ plastic tools to gently dislodge material. Avoid metal tools absolutely. They can scratch and damage the FRP liner. Subsequently, collect all rinse water for proper disposal or treatment. This prevents environmental contamination.
Step 2: Selecting and Applying Cleaning Agents
Choosing the correct cleaning agent is crucial. Consult your tank manufacturer’s guidelines or a chemical compatibility chart. For many acid storage tanks, a mild alkaline solution neutralizes residues effectively. Conversely, tanks that held alkaline materials may require a mild acid wash. Always start with a diluted solution first. Apply the solution using low-pressure sprayers or by filling a small portion of the tank. Let the solution soak to loosen hardened deposits.
Step 3: Mechanical Cleaning and Scrubbing
After sufficient soaking, begin mechanical cleaning. Use soft-bristle brushes or non-abrasive pads for scrubbing. Gently scrub all interior surfaces, including the tank walls, floor, and roof. Pay special attention to seams, nozzles, and baffles. These areas often trap residue. Continue this process until all visible deposits are gone. Then, drain the cleaning solution completely for proper disposal.
Step 4: Final Rinsing and Inspection
Now, conduct a comprehensive final rinse. Use copious amounts of clean water to remove all traces of the cleaning agent. Perform this rinse multiple times if necessary. Check the pH of the effluent rinse water. It should match the pH of your incoming clean water. Following the rinse, allow the tank to ventilate and dry fully. Next, conduct a detailed visual inspection. Look for any signs of damage, like cracks, blisters, or discoloration. Document all findings for your maintenance records.
Step 5: Drying and Return to Service
Ensure the tank is completely dry before closure or reuse. Use forced air ventilation to accelerate drying, especially in humid climates. Moisture can cause contamination or microbial growth. Once dry, close the manways and re-install any internal equipment. Finally, remove isolation locks and tags. You can now slowly place the tank back into service according to your standard operating procedures.
Post-Cleaning Protocols and Best Practices
The process continues after the tank is clean. Implementing strong post-cleaning protocols ensures continued safety and performance.
Waste Disposal and Environmental Compliance
You must handle all waste streams responsibly. Collect rinse water, spent cleaning solutions, and residual solids separately. Then, dispose of them according to local environmental regulations. Partner with a licensed waste disposal contractor if needed. This practice demonstrates environmental stewardship. It also avoids significant legal penalties.
Documentation and Maintenance Scheduling
Meticulous record-keeping is a best practice. Document every cleaning event’s date, procedure, chemicals used, and inspection results. This log provides a valuable history for the tank’s lifecycle. Moreover, use this data to schedule your next preventive maintenance cleaning. Consistent scheduling prevents the buildup of difficult deposits. Consequently, each cleaning becomes easier and faster.
Choosing Quality from the Start: The Role of Reputable Manufacturers
Your cleaning regimen’s effectiveness partly depends on the tank’s initial quality. Reputable FRP Tanks Manufacturers build tanks with smooth, high-gel-coat interiors. This superior finish prevents residue adherence and simplifies cleaning. Therefore, investing in a quality tank from a certified manufacturer pays long-term dividends. It enhances cleanability and extends the asset’s service life dramatically. Companies like UK Enviro Systems design tanks with maintenance in mind, providing detailed care manuals.
Conclusion: A Commitment to Safety and Longevity
A disciplined cleaning procedure is fundamental for FRP Chemical Storage Tanks. This step-by-step guide ensures you remove contaminants safely and effectively. Regular cleaning preserves the tank’s structural strength and protects your stored products. It also upholds the highest safety standards for your personnel. Remember, combining a rigorous maintenance routine with a quality tank from trusted FRP Chemical Tanks Manufacturers is the ultimate strategy. This commitment guarantees the reliable, long-term performance of your critical FRP storage tanks and acid storage tanks, safeguarding your operations and your investment.